M27 - Dumbbell Nebula
M27 resides more than 1,200 light-years away in the constellation Vulpecula. It is what is known as a “planetary nebula,” though it’s got nothing to do with planets. The nebula is the result of an old star that has shed its outer layers in a glowing display of color.
August 20, 2025

Still breaking in the new Hyperstar, and I thought the Dumbbell would make another nice target for testing. I tried shooting initially on what was otherwise a perfect night on August 12 - winds were calm, transparency and seeing were great, and the forecast called for mostly clear skies. As is always the case when using new equipment, the weather had other plans. A single cloud hovered over me until about 12:30am. It cleared up and I set the routine to run and salvage the remaining 4 hours of the night. Clouds eventually rolled in again around 2:30am, and I was left with only 2 hours of data (but it was great data!). The evening clouds finally broke again last night, so I got the scope out again, and I was able to capture about 5 more hours of good data. I was better able to capture and process more of the fainter parts of the nebula. I’ve kept to using the Tri-band filter for it’s wider band-passes, as the Hyperstar reduced the scope to about f/2.2, and at this speed, the wavelengths of the nebulosity are shifted somewhat such that narrower bandpass filters either less effective or completely ineffective. I have an L-Ultimate and an ALP-T I need to test, but from the research I’ve done, it seems like the ALP-T may be too narrow of a bandpass at 5mm, and will eliminate a good portion of signal. The L-Ultimate should work, but I’m a bit concerned about halos… I won’t know until I try! For the time being, I’m continuing to test with a solution that I know will work, since I’ve had so few clear nights to image lately.
I also was able to test out my new windbreak solution last night. This is version 2, as version 1 didn’t work the way I had hoped. I created a PVC structure in an octagon shape (since the spot for my telescope is a circular patio), and used some cheap, fillable umbrella bases to hold the upright poles. I found some 50ft by 6ft woven privacy fabric on amazon, and I draped the fabric from the PVC structure using some Velcro cable ties through the grommets on the fabric. With the Velcro cable ties, I can affix and remove them from the PVC every night, rather than produce the waste of using and disposing of zip-ties every night. I also used 4 tent-stakes to help tie down the structure and give it a little more rigidity. I also ran some string through the grommets on the bottom and around the uprights to hold the fabric a little more taut. It takes me about 5-7 minutes in total to assemble, so I’m pretty happy that I was able to find a solution that works for my typical conditions (5-10mph winds with 15-20mph gusts… The C9.25 with dew shield is a sail!) According to my weather station, there were some 10+mph gusts over about an hour or two period last night, and I didn’t notice any issues with star shapes in the resulting subframes during that time. I can say that I’ve certainly had issues in similar conditions without the windbreak. It remains to be seen if this will be a sufficient solution at 1400mm, but we can test that during the next galaxy season. A couple additional modifications I plan to make is to attach some of the leftover PVC to the bottom of the fabric and run the string through that to keep the fabric taut, and I also plan to cut about 6” off of the upright poles (they’re 7 feet tall now, and they don’t need to be that tall… it leaves about a 1 foot gap underneath the fabric, which is a little too much. I’m not trying to completely stop the wind, just tame it down enough that it doesn’t impact the telescope’s stability while imaging.)
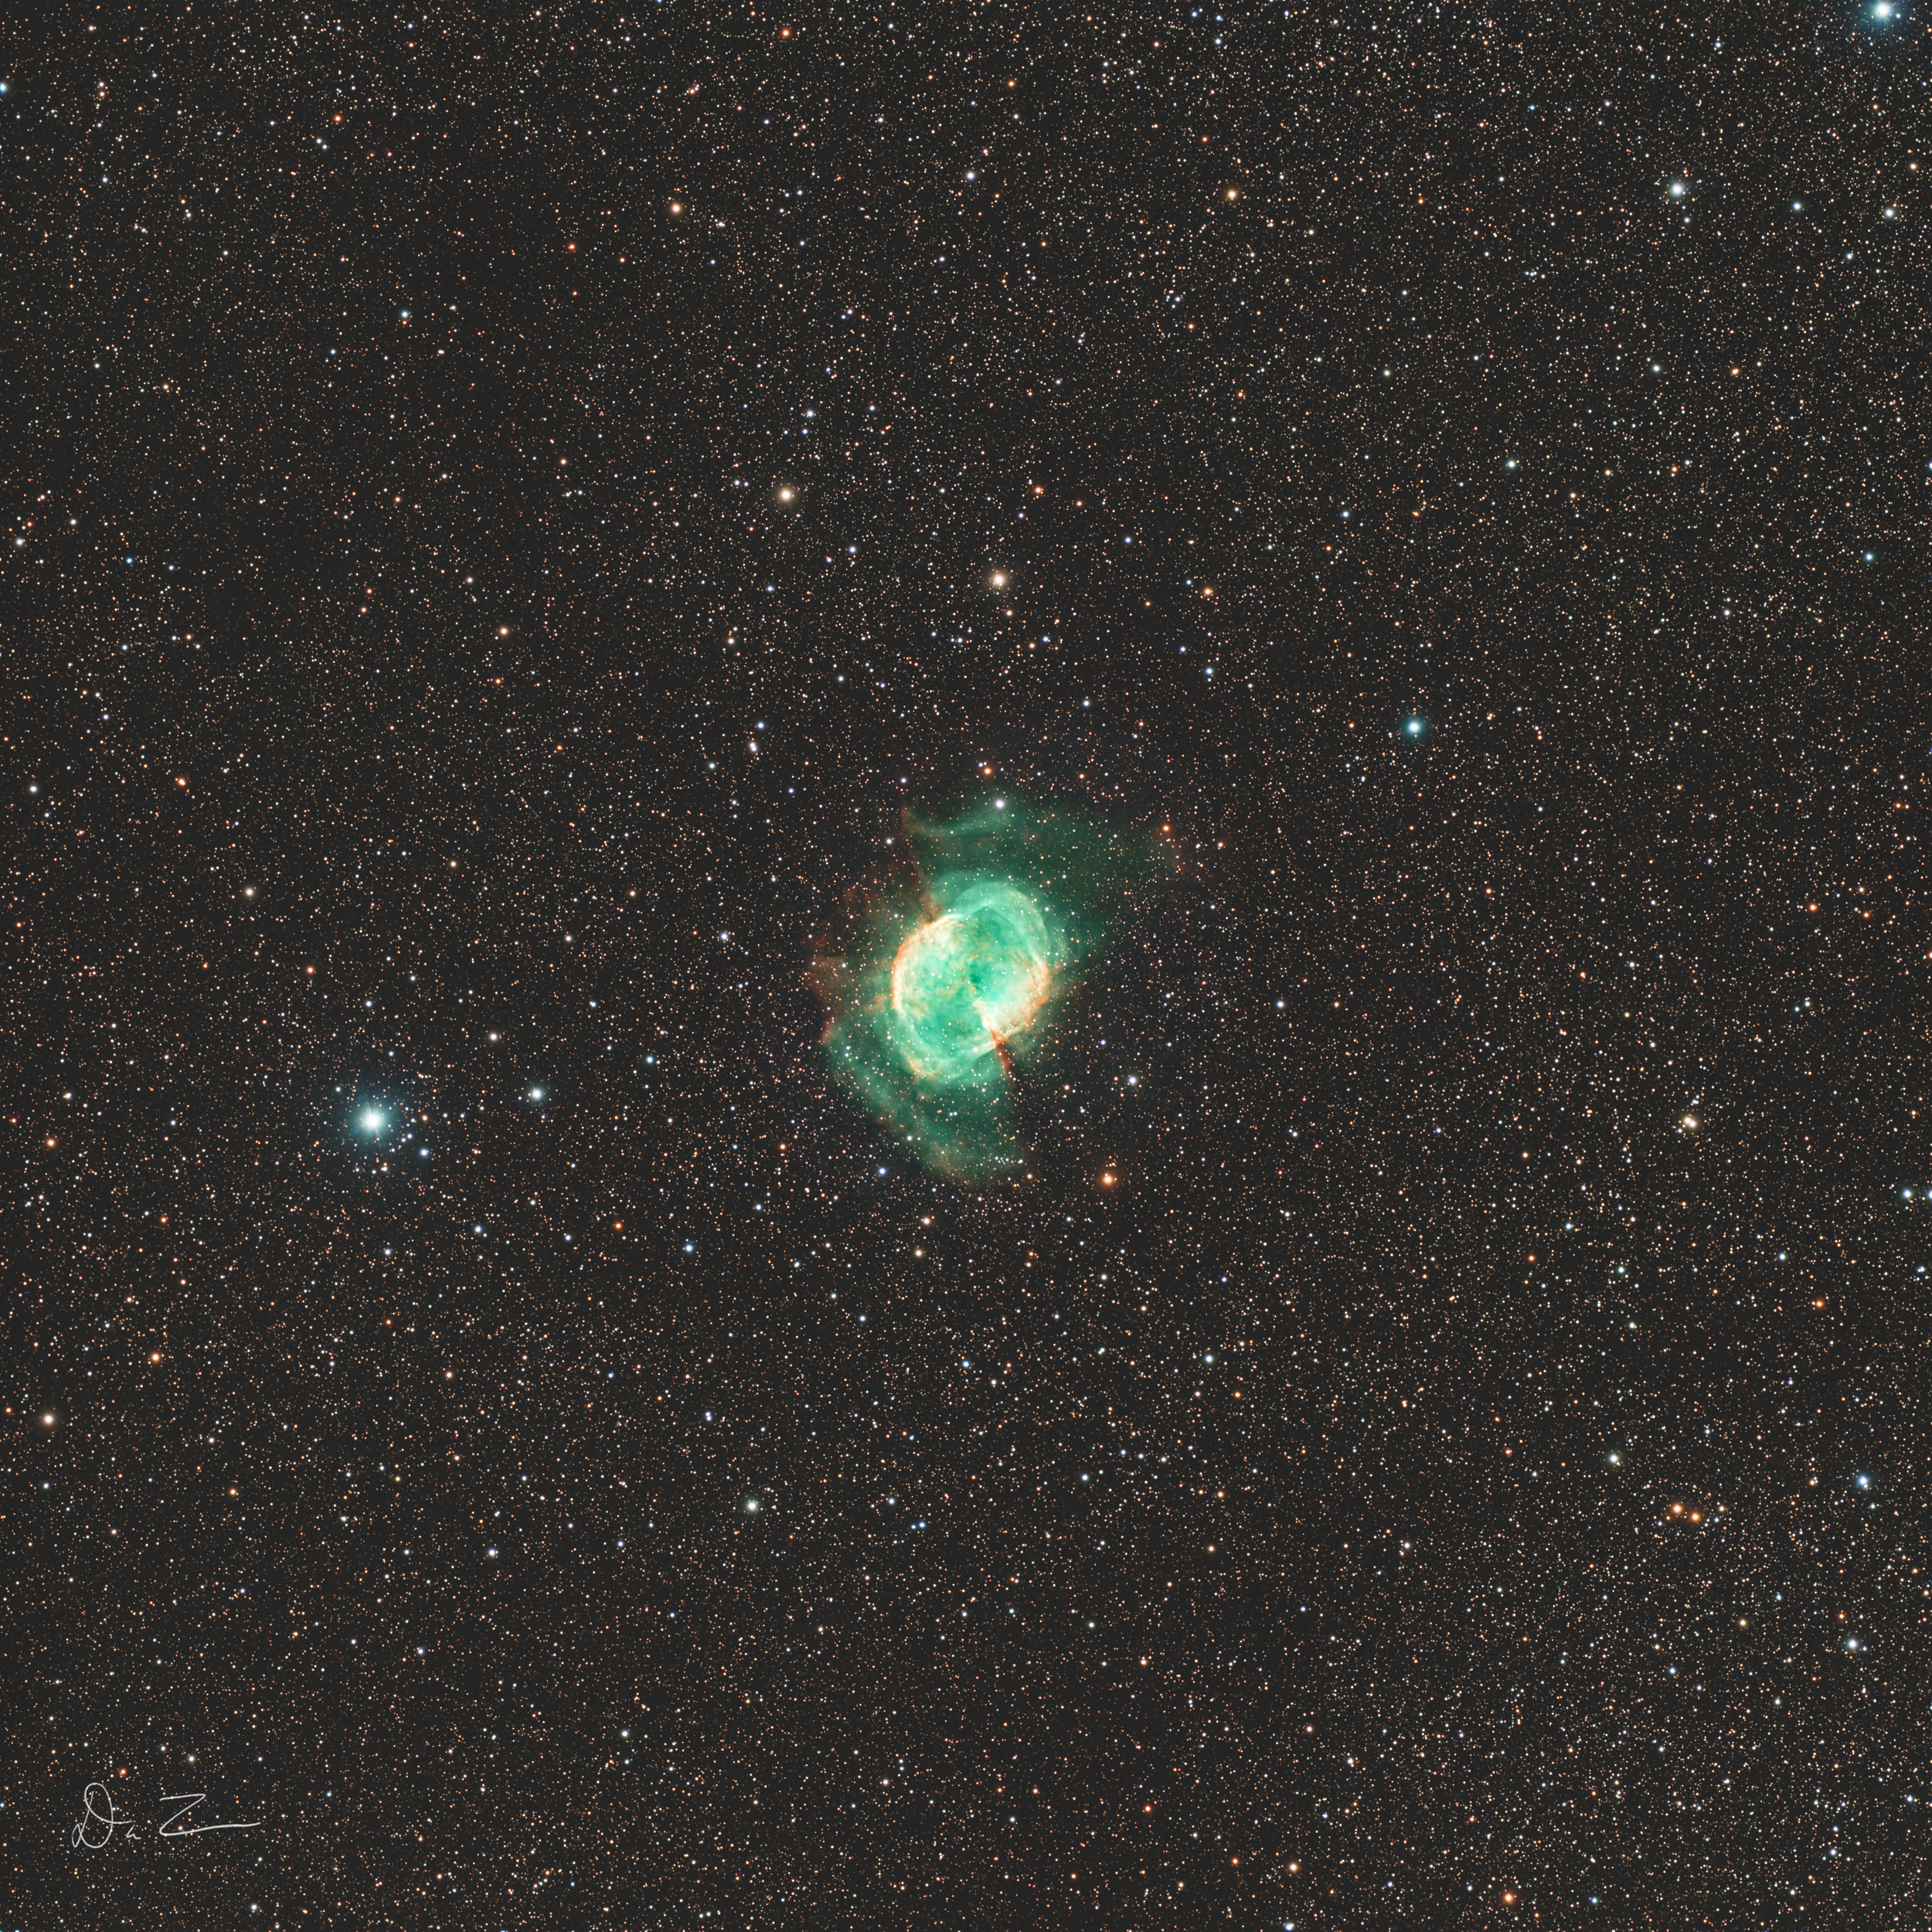
Finally, as an added bonus, I’m always surprised at the amount of stars in some fields. I reduced the stars in the main image to keep the focus on the nebula, but below is a version of the image that I processed with the stars fully included, rather than using StarNet to remove the stars and process them separately from from the nebula. I wasn’t able to get the same level of detail out of this version, but It’s worth posting as a reminder of how many stars are out there. Image solving found almost 25,000 stars, and that is limited to stars over a certain brightness, so I’m sure there’s even more than that in this field!
Technical Details
Imaging Telescope: Celestron C9.25 XLT
Imaging Camera: ZWO ASI533MC Pro
Mount: Sky-Watcher EQ6-R Pro
Filter: Antlia Tri-band RGB Ultra Filter - 2” Mounted
Accessories: Starizona Filter Drawer 2", Starizona HyperStar 9.25 v4, ZWO ASIAIR Plus, ZWO EAF
Software: StarNet, PixInsight, BlurXTerminator, NoiseXTerminator, SetiAstro Statistical Stretch, SetiAstro Star Stretch, Siril, ZWO ASIAIR
Guiding Telescope: SVBony SV106 60mm Guide Scope
Guiding Camera: ZWO ASI174MM
Imaging Dates: August 12, August 15, 2025
Frames (gain 101.0) f/4.9 -10c: 140x180” (7h)
Integration Time: 7h
Darks/Flats/Dark Flats: 30/30/30
Bortle Dark-Sky Scale: 5.00

September 26, 2024

First light with the new telescope! I’m over the moon with how this image turned out with such little exposure time, though it is a fairly bright target… I actually reduced my subframe length to 2 minutes instead of my usual 3 minutes because the core of the nebula seemed a bit blown out. Working with a new type of telescope (newtonian), which is significantly heavier and about 4x longer in focal length meant lots of new bits for my routine. There’s still lots to learn, but I was happy that I was able to get a nice image on the first night. I tossed quite a few frames due to needing to fine tune my guiding, since I’m now guiding at 240mm instead of 120. Once I got it dialed in, it was hovering around .6”-.7” RMA for the night, which was great. I was impressed that the telescope arrived in near perfect collimation after being shipped overseas, so I’m hoping that the scope will continue to hold collimation well, as I move the scope and mount in and out every night. The OTA is aluminum and cools down very quickly to ambient temp, which is great. All-in-all very happy with the result from first light, but still some more tinkering to do to dial things in. I’ll have another image coming soon as well, as I tested it on two targets that night to see how well collimation and tracking and such will hold in a nightly session where it switches targets. It performed excellently!
Technical Details
Imaging Telescope: Orion Optics IDEAL 8
Imaging Camera: ZWO ASI533MC Pro
Mount: Sky-Watcher EQ6-R Pro
Filter: Antlia Tri-band RGB Ultra Filter - 2” Mounted
Accessories: ZWO ASIAIR Plus, ZWO EAF
Software: PixInsight, Photoshop, NoiseXterminator, Starnet, BlurXterminator
Guiding Telescope: SVBony SV106 60mm Guide Scope
Guiding Camera: ZWO ASI174MM
Imaging Dates: Sep. 24, 2024
Frames (gain 101.0) f/4.9 -10c: 90x120” (3h)
Integration Time: 3h
Darks/Flats/Dark Flats: 30/30/30
Bortle Dark-Sky Scale: 5.00